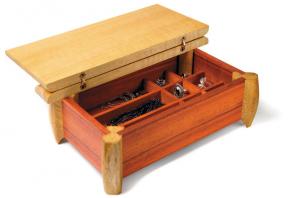
I have a couple of rules in my shop. “If a gift is not complete two weeks before the occasion, stop woodworking and go shopping.” That’s No. 1. The second is the “two-foot” rule: “If a piece of wood is less than 24″ long, toss it out.” I must admit that I do break my own rules. Some gifts have been built right up to, and even past the due date. And it’s not uncommon for me to save a beautiful piece of exotic wood, even if it’s small. This is where my jewelry box comes in.
If you need a last-minute gift idea and you have some beautiful small boards on hand, you have all you need to create this box. Its simple design won’t take long to build, but it’s attractive thanks to the appearance of the wood itself.
Time
Weekend
Skill
2
Cost
3
I chose yellowheart from Brazil and padauk from West Africa for their contrasting hues, but any striking combination of hardwoods will do nicely. Start by rough-cutting a piece of padauk to 1" x 6" x 36". You'll slice this into thinner components later. Next, select two yellowheart boards. Rough-cut one to 1" x 9" x 18" for the lid, and the second to 1" x 2" x 16" for the legs.
Joint one side of each of the yellowheart boards to create flat surfaces, then plane them down to the thicknesses listed. Next, joint the padauk on both faces and one edge, then head to the bandsaw to resaw the board into two pieces. Plane the resulting halves down to about 3/8" thick. I suggest you make a sample groove with your dado blade to use as a thickness gauge, allowing you to plane down to the exact thickness required for a good fit of the sides into the leg grooves. With all your wood roughed out, rip the boards 1/8" wider than listed, then clean the edges up on the jointer to bring them down to final size.

I recommend you prepare the legs from one board for both safety and efficiency. Start by milling a 3/8"-wide groove along the length of your wood, using a dado blade tilted 45º from vertical in your tablesaw. Orient the wood so the surface that will become the inside face of the leg rides against the fence. Repeat the process so there’s an angled groove on both sides of each leg. These grooves will form the joints that create the corners of the jewelry box. With both grooves complete, cut the legs to length.
Shape the curve of the leg using a bandsaw, then sand the cut surfaces using a belt sander. If you don’t own a stationary sander, no problem. Simply invert a portable model and clamp it to your workbench.
Next, scribe a line along the curved portion of the leg 1⁄4" in from the edge on both the sides and faces of the leg. Then cut off the corner on the bandsaw with the table tilted to a 45º angle. Sand these newly created facets on the belt sander as well.
While you’re still near the bandsaw, cut a small scallop out of the back edges of the bottoms of the legs. This creates a visual transition from the bottom of the box to the surface it sits on.
Next, cut the padauk that forms the front, back and sides of the jewelry box. As you work, saw pieces from the board in sequence to ensure the grain is visually consistent as it runs around the corners of the box. Saw some support cleats for the bottom of the box from padauk and plane them to 3/8" square. You’ll need more padauk for the dividers, planed down to 1/4" thick. Cut half-lap joints to connect the long and short divider pieces using a dado blade and a mitre gauge. It’s essential you place a piece of scrap wood behind the dividers as you work to prevent splintering as you saw the half-laps.
The bottom panel of this jewelry box is made of two pieces of 3/8" padauk edge-glued together. Saw the corners off at 45º to match the legs, then sand the surfaces smooth. Roundover the edges of the lid of the jewelry box on your table-mounted router using a thumbnail bit guided by a fence. Rip the lid into two pieces as shown in the plans. Next, bore holes for the barrel hinges using a 10mm brad-point bit. Sand all parts prior to glue-up, with 120-, 150- and 180-grit paper. Glue up the four legs and four sides, then prepare a pattern for cutting the cork that will line the bottom of the box (not pictured). Trace the upside-down box on a thin piece of cardboard (cereal boxes work well), cut it out and transfer the shape to your cork sheet before setting it aside. Now you can cut, mitre and glue the 3/8" square support cleats into the box. These support the padauk bottom, which is a little smaller than the opening to allow for seasonal expansion. For easier finishing, raise the grain by wiping all surfaces with a damp cloth. Allow the wood to dry, then smooth all pieces with 180-grit sandpaper.
Before you apply any finish, use tape to mask the places where the fixed part of the lid fastens to the back of the box. This will allow good gluing surfaces to attach the lid to the box later on.
For a quick and easy finish, I chose a water-based, low-odour, clear matte spray in an aerosol can. It takes 20 minutes to dry and the results are excellent. You could just go with the padauk bottom panel alone, but the box will be gentler on baubles if you cover it with cloth-wrapped cork. Simply wrap the cork you cut earlier with some fabric secured with pins on the bottom, then push this cushion into place at the bottom of the box and drop the dividers into place. Finally, clamp and glue the fixed portion of the lid to the box.
There you have it. A lovely little gift that goes together quickly while helping you use up nice leftover stock you don’t have the heart to toss out.
| Part | Material | Size (T x W x L*) | Qty. |
|---|
| Front/back | padauk | 3/8" x 2 11/16" x 9" | 2 |
| Sides | padauk | 3/8" x 2 11/16" x 5" | 2 |
| Legs | yellowheart | 15/16" x 1 3/4" x 3 1/4" | 4 |
| Bottom | padauk | 3/8" x 5 3/16" x 9 5/16" | 1 |
| Top | yellowheart | 5/8" x 7 5/8" x 12" | 1 |
| Short cleats | padauk | 3/8" x 3/8" x 3 31/32" | 2 |
| Long cleats | padauk | 3/8" x 3/8" x 8" | 2 |
| Short dividers | padauk | 1/4" x 11/16" x 5 9/32" | 2 |
| Long dividers | padauk | 1/4" x 11/16" x 9 3/8" | 2 |
| Bottom pad | cork | 1/4" x 5 5/16" x 9 3/8" | 1 |
| Barrel hinges | 10-mm-dia. | 2 | |
* Length indicates grain direction
Recommendations

canadianhomeworkshop.com is part of the Blue Ant Media
Canada Network
© 2024 Blue Ant Media
More information
Social Media & RSS


Our other sites


No comments
To leave a comment, please log in
Don't have an user account? Register for free