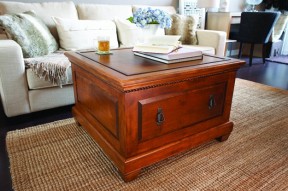
Finding a coffee table that works in a small space can be difficult. Typical designs are usually too large to work in tight quarters or too small to be functional. No matter what style you choose, a coffee table takes up valuable floor space that could be used for additional seating or storage. I really like the square coffee tables I’d seen, but they all tend to be too large (generally, 36″ to 42″ square) for a small space. To address these problems, I have reduced the size of my table down to about 32″ x 32″. It now takes up considerably less room than its full-size counterparts, yet still looks and works great.
This table is made of 3/4"-thick hard maple, but any species of wood will work fine. I began by milling my lumber for the stiles and rails for the main carcass’s frame-and-panel sides. You’ll need to make four 31⁄2" x 24" upper rails and four lower rails an inch wider at 4 1/2" x 24" before moving to the stiles. The four stiles for the front and rear frames measure 2 1/2" x 17" and the four stiles for the side frames are 3/4" narrower at 1 3/4" x 17".

With the above lumber milled, create the four raised panels. These are all made from 3⁄4"-thick lumber with a bevelled profile along the edges. I cut this profile on my tablesaw, but a router is another option. Begin by cutting each panel blank to 9 5/8" x 24 3/4". (See Creating raised panels on your tablesaw below).

Before you assemble the frames and panels that make up the sides of the table, you have some decisions to make. Select the best upper and lower rail, the two best wide stiles and the best panel, then set them aside. These make up the front and drawer, so make sure you choose nice wood.
The remaining three sets of stiles and rails need a 1/4"-wide x 3/8"-deep groove milled into their inward-facing edges to accept the tongues of their respective panels. I used a 1/4"-diameter straight bit in a router table and milled full-length grooves in the rails. The stiles received stopped grooves that end 3" from the top and 4" from the bottom. The next step is to determine how you’d like to attach the stiles and rails together. You can use biscuits, pocket-hole screws or a row of 3/8"-wide x 1 1/2"-long dowels at each joint, as I did.
Secure the stiles and rails around the panels using glue at the joints. Do not apply any glue into the grooves; the panels need to be able to float. Finally, grab the wood set aside earlier and build the frame for the front of the table. Check for square and allow the glue to set.
While the glue is drying, cut 1/2"-thick maple plywood for the base of the table. Cut this base to exactly 29" x 29" and ensure it is completely square. You can double-check square by measuring diagonally from corner to corner. If the measurements from each set of corners are exactly the same (41"), you know that your base is square. This is an important step because the whole table will be squared using this base. If it is out of square, the rest of the table will be as well.
With the glue dry on the frames, finish-sand your joints to make sure they are flat. Next, bring the first three frames and panels and the front frame together, upside down, on your bench or the floor. Butt and glue the side panels against the back and front panels. You can use a couple 1 1/4"-long brads driven through the top and bottom inch of the stiles to aid with the glue-up, as you will cover the nails with the trim later.
With the four sides glued up and clamped, run a bead of glue along the entire bottom edge of all four bottom rails. Place your base on top. If your table’s sides don’t line up exactly with the outside edges of the base, loosen the clamps and shift the carcass. Once the base and carcass mate flawlessly, the assembly is square and you can drive a few brads or countersunk screws through the plywood and into the rails to lock everything together while the glue dries.
Now, it’s time to move to the top of the carcass. Make a ledge for the tabletop to sit at just the right height when it is inserted. Use glue and screws to attach four 3/4" x 1 1/4" cleats to the inside of the carcass, positioned exactly 1" down from the top edge of the top rails on the frames.
The frame at the top of the carcass is made up of four mitred pieces 2 7/16" wide x 32" long. I cut these pieces on a mitre sled, then joined them with 3/8"-diameter dowels. As with carcass frames, you could also use biscuits or pocket-hole screws (driven in through the bottom surfaces only). Once this frame is built, attach it to the table using a bead of glue along the top edges of the carcass frame. Check to make sure the spacing is even all around, then clamp and allow the assembly to dry.
While the carcass is drying, make the flippable lid that will function as both the tabletop and the cushion holder. Precision is critical here because the lid needs to fit tightly yet have enough clearance so that it can be removed easily (about 1/16" all the way around). I built the lid frame from walnut for visual interest, but maple will work as well. Make up the frame by cutting four 3/4" x 1 7/8" x 27" pieces with 45° mitres. The finished length must be exactly 27", so cut the pieces slightly longer and sneak up on the correct measurement with multiple cuts. The next step is to cut a tiny bevel (1/16" or so) on all the edges of the lid frame. These bevels add visual interest to the top, help to camouflage the required gap around the edge and, on the cushion side, lessen the chances of getting slivers.
With these frame pieces cut, you need to cut another piece of 1/2"-thick maple plywood to fit exactly inside the frame. While this lid should measure 25 1/2" x 25 1/2" in theory, even a small variation in the frame size will change this measurement slightly. Start by cutting your plywood just a hair too long in every direction, then trim it until you have a perfect fit between the plywood and your lid frame. If you are cutting your plywood on the tablesaw, cut it with the best face up so any tearout will be on the face that the cushion will cover later.
Finally, wrap the plywood lid with the frame pieces. Using biscuits or dowels to reinforce the connection, glue the frame to the lid, leaving the frame 1/8" proud of the “good” (top) face of the plywood. Like the bevels, this arrangement adds visual interest and helps hide the gap we need to leave. Clamp up the lid and allow it to dry.

By this time, the glue holding the frame on the top of the carcass should be dry, so you can put some trim under the edge of the frame to ease the visual transition between the top frame and the carcass. I used two different profiles for my table: one shop-built and one purchased. The shop-built trim was just 3/4"-thick x 1"-wide strips of maple that I ran over a 3/4"-radius cove-moulding bit in a router table. I then mitred and glued this cove trim in place. Directly under this trim, I applied a rope-motif trim bought from a home-improvement centre. I cut this trim to fit and secured it with yet more glue and a few brads driven in between the “strands” of the rope, so the nails wouldn’t be seen.
In order to give the table a heavier look, and to cover the plywood base, I wrapped the base with four pieces of maple measuring 3/4" x 3" x 30 1/2", which I had routed with a decorative ogee and bead profile on the router table before mitring the ends. As before, cut these pieces slightly long and sneak up on the final measurement to get a perfect fit. Once you are satisfied with your fit, attach the base trim flush with the bottom face of the base using glue. If you have an 18- or 23-gauge nailer, a couple of 1 1/4"-long fasteners driven from the inside into the base trim will help hold everything in place while the glue dries.
To bring the table up to the final height of 20 1/2", I added some simple shop-built feet measuring 2 1/2" tall, which I made on the bandsaw using 2 3/4" x 2 3/4" stock. No thick maple in your shop? No problem. There are many different manufactured, wooden feet available to the home workshopper. Just pick a style and height that suits your taste, order four and screw them into place. This is an easy and inexpensive alternative to shaping your own.

The size and mounting of your drawer depends on the slides you use. For this table, I used 22" bottom-mounted slides that require a drawer box 5/8" narrower and 1" shorter than the finished opening. I made the drawer from more 1/2"-thick maple plywood. Its four sides are grooved to accept the bottom (also 1/2"-thick plywood). The sides are glued and dowelled together, and then installed according to the directions included with the slide assembly. Because spacing requirements vary from manufacturer to manufacturer, and even from model to model, build your drawer once you have the instruction sheet for the metal slides.

Each blumotion drawer slide has a lever that attaches to the bottom of the drawer. The lever allows you to clip in and un-clip the drawer with ease.
Regardless of what size your drawer ends up being, what is important is that it is installed so that the front of your drawer box is even with the back side of the stiles and rails. Here’s why: your last step is to take the raised panel you set aside earlier and trim it to fit into the drawer opening with minimal (1/32" or so) clearance all around. This panel becomes the drawer front. The result is a table front that looks exactly like the panels around the rest of the table, until you give it a pull. If you want to get creative, you could use hardware that would make this a secret push-to-open drawer and omit the pulls completely.
Mount your drawer front to your drawer box by positioning it perfectly in the opening using small spacers around the outside. Drive four 1"-long pan-head screws from the inside, through the drawer box and into the raised panel. Finally, mount your drawer pulls.
As much as I like hard maple, it’s not the most visually interesting wood in the world, so I decided to go with a medium-brown stain. Now, maple is famous for going blotchy when stained, so if you want a nice, even finish, make sure you use a pre-stain conditioner before applying your colour. I really wanted an old, antique look for this table, so I skipped the conditioner step and applied the stain directly. For the protective topcoat, I sent the piece out to a shop with a spray booth to apply a satin-sheen clear lacquer.
With the finish done, it was time for the final step: making the cushion. I bought a 2" x 25 1/4" x 25 1/4" piece of high-density foam and enough fabric to cover it at a local fabric store. I glued the foam to a 25" x 25" piece of 1/2"-thick plywood backing and then wrapped the whole thing with fabric. I took special care to fold over the fabric neatly in the corners before I used 1/4" staples to secure the cloth to the cushion backing. The whole thing sits in the lid frame, where it is held by a heavy bead of hot glue applied to the plywood lid before insertion.
Insert your top so it rests on the cleats and that’s it: a great-looking table, extra seating and new storage all in one.
Make raised panels on the tablesaw in five steps. These instructions are for a left-tilt machine.
1. Clamp a tall auxiliary fence to your existing fence and set it 1/2" from the blade.
2. Using the blade-tilt function of your saw, set the blade angle to 10° from square (tilting it away from the fence), then raise the blade to approximately 2 1/2" above the table.
3. Run your stock through on edge, ripping a bevelled piece off each face. This can be a dangerous operation, cutting the narrow end of each panel. If you are at all uncomfortable, use a tenoning jig on your saw to make the end cuts.
4. Without moving the fence, reset your blade angle at 90º from square, lower it to 3/8" above the table surface. Make one more pass around the panel. This process cuts a stepped ridge into your bevel cut, allowing the panel to seat properly into the stiles and rails.
5. Finally, install a dado blade into your tablesaw. With the panels flat on the table, cut a 3/8"-wide x 1/4"-deep rabbet around the back of the panel. These cuts will leave you with a raised panel with a 3/8"-wide x 1/4"-thick tongue around the edges.
| Part | Material | Size (T x W x L*) | Qty. |
|---|
| Front and rear stiles | maple | 3/4" x 2 1/2" x 17" | 4 |
| Side stiles | maple | 3/4" x 1 3/4" x 17" | 4 |
| Upper rails | maple | 3/4" x 3 1/2" x 24" | 4 |
| Lower rails | maple | 3/4" x 4 1/2" x 24" | 4 |
| Panels | maple | 3/4" x 9 5/8" x 24 3/4" | 4 |
| Base | maple plywood | 1/2" x 29" x 29" | 1 |
| Long cleats | maple | 3/4" x 1 1/4" x 27 3/8" | 2 |
| Short cleats | maple | 3/4" x 1 1/4" x 25 3/4" | 2 |
| Top frame rails and stiles | maple | 3/4" x 2 7/16" x 32" | 4 |
| Top cove trim | maple | 3/4" x 1" x 30" | 4 |
| Top rope trim | hardwood | 1/4" x 5/8" x 30" | 4 |
| Base trim | maple | 3/4" x 3" x 30 1/2" | 4 |
| Feet | maple | 2 3/4" x 2 3/4" x 2 1/2 | 4 |
| Lid rails and stiles | walnut | 3/4" x 1 7/8" x 27" | 4 |
| Lid | maple plywood | 1/2" x 25 1/2" x 25 1/2" | 1 |
| Cushion backing | maple plywood | 1/2" x 25" x 25" | 1 |
| Drawer front/back | maple plywood | 1/2" x 6 1/4" x 22 3/4" | 1** |
| Drawer sides | maple plywood | 1/2" x 7 1/8" x 21 3/4" | 1** |
| Drawer bottom | maple plywood | 1/2" x 21 1/2" x 22 3/4" | 1** |
| Drawer slides | Lee Valley #02K51.55 | 1 pair | |
| Drawer pulls | Lee Valley #01W32.12 | 1 pair | |
| Foam | 2" x 25 1/4" x 25 1/4" | 1 | |
| Fabric | 36" x 36" | 1 | |
| **Adjust drawer components to fit drawer slides | |||
* Length indicates grain direction
Jointer
Planer
Tablesaw
Router table
18-gauge nailer
Random-orbit sander
Bandsaw
Recommendations

canadianhomeworkshop.com is part of the Blue Ant Media
Canada Network
© 2024 Blue Ant Media
More information
Social Media & RSS


Our other sites


No comments
To leave a comment, please log in
Don't have an user account? Register for free