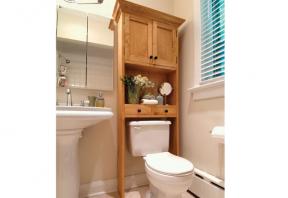
Most bathrooms are small and don’t have enough room for all the products and gear used in the daily routines of the entire family. Make room for clutter and keep it organized and behind closed doors by building this attractive cabinet. This project looks best when made with thicker-than-standard materials. Anything thinner than 7/8″ looks flimsy running up the side of a six-foot-tall piece, and that’s how a thickness planer and jointer come in handy. Although it’s possible to build the project from standard, 3/4″-thick lumber (with a few adjustments to part sizes), I recommend you follow my heftier lead.
Begin by selecting material for the two sides and five shelves. Cut these parts to rough size, leaving two or three inches of extra length before dressing them to finished thickness. Joint one edge and rip the sides and the bottom shelf to 7 1/2" wide. The wide shelves need to be 7 1/8" wide and the narrow shelf 6 1/8". Crosscut the two sides to 72" long, but don't make the bottom ends quite square. Instead, angle these back 1º from square, so the front edge of each side is slightly longer than the back. This tilts the completed cabinet backward slightly, making it more stable. When the cabinet's done you'll also anchor it to the wall as another safety measure.
Next, place the sides on your bench, inside face up, and prepare to mark shelf locations. Before you begin, check that both sides are exactly the same length and that you have the front edge of each side clearly identified. Remember, the front is the longer edge.
Start at the top and measure down 2 1/2". This marks the bottom edge of the top shelf, allowing 2 1/4" for crown moulding with 1/4" of the shelf revealed below it. Scribe a line across both sides with a square, then mark an X on the upward side of this line to show where the shelf will land.
Next, measure 11 1/2" down from the top. This marks the spot for the bottom edge of the narrow shelf. Again, mark another X on the upward side of this line, also making note that the narrow shelf is set back one inch from the front edges of the sides to make room for the doors.
It's time for another mark now, this time 21 1/2" down from the top. Scribe a line across the sides and draw an X above it. This is where one of the wide shelves will go; this shelf's top edge defines the bottom extent of the door opening.
Mark a spot 37" down from the top, for the location of another wide shelf piece, then mark another line 42" down. This last mark locates the bottom edge of the bottom shelf, leaving 30" to the bottom of the sides. This dimension allows the cabinet to straddle most toilets, but if any adjustments need to be made to accommodate an unusual toilet height, make the changes now. Tweak the distance between the doors and the drawers, or upper and lower middle shelves as needed.
With your shelf lines drawn, rout a 3/8" x 3/8" rabbet along the back inside edges of both sides. Rout from the top down to the middle of the bottom shelf position, the place where the back slats stop.
This project is held together with #20 biscuits, so mark their locations and cut slots for them. To boost accuracy, avoid measuring and marking individual slot locations. Instead, hold the shelf in place against the sides and make one continuous pencil mark across both side pieces. Position biscuit slots about 1 1/2" in from both front and back edges. When you've finished all the pencil work, cut the biscuit slots.
Lay both sides on your workbench again and insert biscuits into the slots without glue. It's not unusual for complex biscuit-joined assemblies such as this project to run into snags as parts come together, and you don't want that to happen with glue complicating the issue. Fit shelves onto the biscuits and dry-assemble the entire framework with the help of some clamps. Mark the shelf locations on back edges to avoid confusion during final assembly with glue. Check that the corners are square and make sure all pieces are easily aligned. This is also a good opportunity to lay out and cut the central drawer divider. Mark this on the bottom and lower middle shelf. Measure the distance between the two shelves and cut this piece with the grain running the same way as that on the sides. Take apart the framework and sand all the interior surfaces with a 120-grit abrasive in preparation for final glue-up.
This is the step in which things have to go smoothly, or there's a big mess to deal with. Having just dry-fitted and labelled all the parts, make sure you have the necessary clamps on hand, pre-adjusted. When everything you need is within reach, apply glue to all the slots in one side and the corresponding slots in the shelf ends. Now butter up enough biscuits to fill these slots and assemble this part of the framework. A clean flux brush is ideal for spreading glue here.
Next, apply glue to the slots in the other side and the slots in the other ends of the shelves. Butter up more biscuits to fill these slots, nestle the second side in place, and then clamp everything together while making sure that the back edges of the shelves line up correctly with the sides. Don't worry about alignment of the front shelf edges for now, since everything can be made flush here after the glue dries. Check and adjust the framework for square, then install the central drawer divider with glue and a few small finishing nails.
As with the sides, I like to use thicker material for doorframes too. It stays flatter than 3/4" stock, and it looks better too. With the framework assembled, you can now measure accurately for the doors. The overall door opening should be 18" x 23 1/2", so you need to build a pair of doors measuring 11 3/4" wide x 18" high. You'll need to plane these later for an optimal fit. Notice that the top rail and the side stiles are two inches wide, while the bottom rail is 2 1/2" wide. A little extra wood along the lower part of each door gives more traditional proportions.
The doors I designed include simple 1/4"-thick flat panels cut from solid stock and bookmatched so they look great. Being split from the same piece of wood, each side of the grain pattern is a mirror image. You could use a plywood panel or a raised panel, depending on your taste and patience.
Prepare wood for door stiles and rails, including a 1/4"-wide x 1/2"-deep dado along all the inside edges of rails and stiles. Since this groove is made to accept the door panels, you may need to tweak the dado width depending on the stock you're using. So-called 1/4" plywood is often substantially thinner than 1/4", so check before you rout.
The plans show how the rails are joined to the stiles with 1/4" x 1/2" stub tenons. Prepare these now and dry-fit the door frames together. Check for square and overall size, and then measure for the door panels. The door-panel height can be fairly tight at the top and bottom, but you should leave 1/8" of space for seasonal movement along each side of the solid panels. Plywood panels can fit tight all around because they're immune to moderate humidity changes.
Sand the panels and the inside edges of the frames with 120-grit sandpaper, then dry-fit the door parts to make sure they come together properly. This is a great time to prefinish the panels so they don't show any unfinished areas if dry weather causes them to shrink. When you're ready for final door assembly, apply glue to the stub tenons and also to the corresponding grooves in the stiles. Whatever you do, work neatly. You must avoid getting glue on the panels since it could interfere with seasonal movement and cause cracking. Clamp each door immediately after assembly and check to make sure that the corners are square and flat.
The drawers are simple boxes with 3/4"-thick fronts and 1/2"-thick sides and backs. The bottoms can be 1/4"-thick pine or hardboard. I like to use one board for both drawer fronts so the grain pattern is continuous across them. Cut the drawer fronts, sides and back 1/16" less in height than the opening so the drawers will slide smoothly. Label all parts, then plow a 1/4" x 1/4" dado to accept the drawer bottom. Corner joinery is simple: a 1/2" x 1/2" rabbet on both ends of the drawer fronts and a 1/4" x 1/2" rabbet on both ends of the drawer backs. Cut the drawer bottoms and dry-fit all drawer parts to highlight any areas that need adjustment. Check overall drawer width, then glue and clamp the parts together. A belt sander is an excellent tool for adjusting final drawer size for a smooth-sliding fit within the openings.
The easiest way to fit the doors is to lay the cabinet on its back, and then place the doors in position. The interior shelves will hold them up. You'll almost certainly need to make adjustments, and a sharp hand plane is the tool of choice for this job. Aim for a 1/16" gap all around, with a slight bevel along the hinge side, so the face of each door is slightly wider than the back. This allows the doors to close without binding within the sides. Once your planing work is done, install hinges and hang the doors. I chose simple, mortise-free hinges: they don't show much on the finished project, but the ball tips do add a bit of class to the overall impression of the project.
Once the doors are hung, final fitting is done with a sharp block plane to create an even gap around the doors, and to make sure the two doors don't collide with each other in the centre. Take the doors off now for final sanding.
I bought some V-groove, knotty pine panelling for the back slats, the kind that comes shrink-wrapped at building-supply outlets everywhere. Select the best pieces, then sand and finish them before nailing them in place. You'll need to take off the tongue on one back slat so it fits properly in the 3/8" x 3/8" rabbet you routed earlier in the sides.
It takes about five feet of crown moulding to cover the top of the project, and I installed it a little differently than the usual method. Start by sanding the crown by hand with 180-grit paper to get rid of the mill glaze and planer marks, then cut a triangular filler piece for behind the crown. This gives more support than with most crown installations. Cut, glue and nail the filler in place, flush with the tops of the sides, and then prepare the crown. As with the drawer fronts, cut the crown from a continuous piece of wood so grain patterns wrap around the project. You'll get the best results if you leave the side pieces of crown longer than needed for now, then get the mitre joints right before trimming to final length at the back ends. This approach allows multiple attempts to get the all-important mitres spot-on. A sharp block plane is the ideal tool for tweaking these prominent joints.
The cap starts with a 3/4"-thick piece of pine that needs 1/2"-deep rabbets milled on all four sides. The back rabbet is 1/2" x 3/8" to accept the back slats; side rabbets are 1/2" x 3 3/4" (to extend over the crown moulding, triangular fillers and sides); and the front rabbet is 1/2" x 2 3/8" (to fit over the crown and the filler). The 1/4" of cap that rises above the rabbets is best rounded over for good looks. Apply some glue, then nail the cap down into the sides.
Drill and install your drawer and door hardware, then give everything a final sanding before cleaning up the shop and getting out the finishing supplies.
I chose to stain this cabinet with the old classic, Minwax Puritan Pine, followed by one coat of Minwax Wipe-On Poly. Let this dry overnight, then lightly sand the surface with 240-grit paper and apply a 50/50 blend of Wipe-On Poly and gloss polyurethane. This creates an attractive, low-lustre finish, while offering plenty of moisture protection that will stand up well in the bathroom.
| Part | Material | Size (T x W x L*) | Qty. |
|---|
For the cabinet |
|||
|---|---|---|---|
| Sides | 1" x 7 1/2" x 72" | 2 | |
| Bottom shelf | 1" x 7 1/2" x 23 1/2" | 1 | |
| Wide shelves | 1" x 7 1/8" x 23 1/2" | 3 | |
| Narrow shelf | 1" x 6 1/8" x 23 1/2" | 1 | |
| Central drawer divider | 1" x 4" x 7 1/8" | 1 | |
| Back slats | 3/8" x 3 1/2" x 41 3/8" | 7 | |
| Crown moulding | 9/16" x 3 1/8" x 60" | 1 | |
| Crown filler piece | 2 1/4" x 2 1/4" x 60" | 1 | |
| Cap | 3/4" x 9 7/8" x 30 1/4" | 1 | |
For the doors |
|||
|---|---|---|---|
| Stiles | 1" x 2" x 18" | 4 | |
| Top rails | 1" x 2" x 8 3/4" | 2 | |
| Bottom rails | 1" x 2 1/2" x 8 3/4" | 2 | |
| Panels | 1/4" x 8 5/8" x 14 1/2" | 2 | |
For the drawers |
|||
|---|---|---|---|
| Drawer fronts | 3/4" x 3 15/16" x 11 1/8" | 2 | |
| Drawer backs | 1/2" x 3 15/16" x 11 1/8" | 2 | |
| Drawer sides | 1/2" x 3 15/16" x 6 1/2" | 4 | |
| Drawer bottoms | 1/4" x 6 1/4" x 10 5/8" | 2 | |
* Length indicates grain direction
Recommendations

canadianhomeworkshop.com is part of the Blue Ant Media
Canada Network
© 2024 Blue Ant Media
More information
Social Media & RSS


Our other sites


No comments
To leave a comment, please log in
Don't have an user account? Register for free