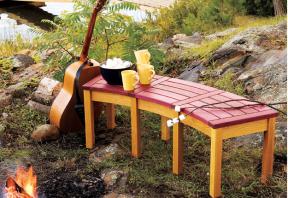
These curved hardwood benches are designed to wrap around a firepit, but their natural shape and charming design also make them perfect accent pieces for the garden. The base is constructed from durable white oak and the contrasting curved seat is made from South American purpleheart. These woods have common features that make them perfect for outdoor use: they’re highly resistant to decay, fungi and burrowing insects.
The seat consists of concentric rows of curved slats that are joined together on the ends by straight rails. Start by making the curved pieces using a technique called template routing. As the name suggests, this method uses templates made from plywood and a table-mounted router equipped with a bearing-guided flush-trim bit to reproduce curved or irregular shapes in wood.
You need to prepare three blanks of each size of seat slat. Saw the ends of each blank to an 82 1/2° angle to fit tightly between the stop blocks on the templates. Just be careful. If your angle cuts aren’t accurate, you’ll end up with gaps at the joints when the parts are assembled. Examine the blanks to find the sides with the fewest flaws and most appealing grain patterns, then mark these sides as top.
Now take one of the blanks, position the template on the bottom and trace the curved profile with a pencil. Remove the template and cut curves at the bandsaw, remaining approximately 1/16" from the layout lines. When you’re done, reposition the template on the bottom of the blank and secure it with a couple of finishing nails. Leave the heads proud of the surface so you can remove the nails with a claw hammer later. Don’t worry about the nail holes. They will be hidden from view on the underside of the seat. Install a bearing-guided flush-trim bit in your table-mounted router and set the height so that the bearing runs directly against the template.
Fire up your router and follow the edge of the template with the guide bearing to trim the waste material from the sides of the slats. If you find the wood is splintering as the router bit passes over, slow down the feed rate. Repeat this procedure to shape all the curved slats that are required to complete the seat. When the curved parts are done, cut out the straight rails that connect the ends of the slats. Prepare for final assembly by chamfering the top edges of all the seat parts using a 45° bearing-guided bevelling bit.

I used 3/8"-diameter x 1 1/2"-long fluted dowel pins to join the slats to the rails. Dowels are easy to install if you have an accurate jig to align the holes, and they result in very strong joints. After drilling the dowel holes, dry-fit the seat to make sure all the parts come together as planned. The curved shape makes clamping the assembly a little more challenging, so it’s best to experiment with different techniques before applying glue. I ended up wrapping a belt clamp around the outside of the seat assembly and securing the top corners with a long bar clamp to prevent the upper joints from pulling apart.
Once you come up with a strategy that works with your equipment, go ahead and grab the glue bottle to complete final assembly. I used a weatherproof Type II polyurethane adhesive to assemble my bench, but any good-quality outdoor glue will do.
While the seat assembly is drying, begin work on the base. It’s made of beefy 1 3/4" square legs, joined together at the top with horizontal rails. As an added challenge, the rails situated at the front and back of the bench are curved to match the shape of the seat that sits on top.
Begin by cutting oversized blanks for the legs from rough 8/4 lumber. After making two adjoining faces flat and square using a jointer, use a thickness planer to mill opposing sides until you reach a final thickness of 1 3/4". This technique leaves you with four square corners and avoids the need for tedious sanding to remove saw marks. Trim the legs to length, then tilt your saw blade 45° to chamfer the edges on the bottom end. This bevel helps prevent the legs from splintering when the bench is dragged across rough surfaces.

Next, tackle the rails that connect the legs together at the top. The straight rails are easy–all you need to do is cut them to size from 3/4"-thick material. Creating the curved rails, on the other hand, is a little more complicated. These parts are too wide for template routing. One alternative is to laminate thin material around a curved form, but this technique takes a lot of time and there is a possibility that exposure to the weather will cause the layers to separate. An easier method is to start with thicker wood and cut out the curved shapes freehand at the bandsaw. Start by preparing blanks from 1 1/2"-thick stock, then mitre the ends at an 82 1/2° angle, just like the ends of the benchtop slats. Now grab your trammel stick and lay out full-sized cardboard patterns. Cut out the patterns and trace the shape onto the top of the blanks. When you do this, make sure the ends of the pattern align with the bevelled ends of the blanks. Head over to the bandsaw and cut along the outside of the layout lines carefully.
Sand away tool marks and make the surfaces smooth. I took care of the inside curves using a large drum in my oscillating spindle sander, but the curved roller on the end of your stationary sander will achieve similar results. Your best option for the outside curves is a belt sander or the flat section of your stationary sander. Proceed with caution when sanding near the ends to avoid rounding over the joint edges. Also, don’t spend a lot of time sanding the interior face of the curves. These sections won’t be seen after assembly.
Once again, I used dowels to assemble parts for the base. Three fluted dowel pins per joint are more than enough to guarantee that the pieces never come apart. It’s much easier if you finish-sand all of the components prior to final assembly. Don’t forget to ease the crisp corners of the legs with a little light sanding. You’re going to face the same clamping issues that you had with the seat, so complete a dry run to come up with a solution that works for you. When you’re ready, apply glue to the dowel holes and the ends of the joints and bring all the parts together to assemble the base. Be prepared with a damp rag to wipe up glue squeeze-out.
Once the base has had an opportunity to dry overnight, attach the seat to the frame rails with stainless-steel screws. Predrill holes for the screws to prevent splitting the wood, and counterbore the heads 5/16" to accommodate tapered wooden plugs. I made my plugs from white oak to tie in with the base and to create a nice contrast to the deep violet shade of the seat. To finish the bench, I wiped on three coats of Circa 1850 Tung ’n Teak oil. Once a season, I’ll reapply a fresh coat of oil to keep the wood looking fresh, and in the winter, I’ll store the bench indoors, away from snow and ice.
| Part | Material | Size (T x W x L*) | Qty. |
|---|
Seat |
|||
|---|---|---|---|
| Straight rails | purpleheart | 1' x 2 1/4" x 16" | 4 |
| Slat 1 | purpleheart | 1' x 4" x 11 15/16" | 3 |
| Slat 2 | purpleheart | 1' x 4" x 12 13/16" | 3 |
| Slat 3 | purpleheart | 1' x 4" x 13 5/8" | 3 |
| Slat 4 | purpleheart | 1' x 4" x 14 1/2" | 3 |
| Slat 5 | purpleheart | 1' x 4" x 15 5/16" | 3 |
Base |
|||
|---|---|---|---|
| Legs | white oak | 1 3/4' x 1 3/4' x 16" | 8 |
| Straight rails | white oak | 3/4" x 3" x 11 1/2" | 4 |
| Curved front rails | white oak | 1 3/4' x 3" x 12 1/8" | 3 |
| Curved rear rails | white oak | 1 3/4' x 3" x 15 5/8" | 3 |
* Length indicates grain direction
Recommendations

canadianhomeworkshop.com is part of the Blue Ant Media
Canada Network
© 2024 Blue Ant Media
More information
Social Media & RSS


Our other sites


No comments
To leave a comment, please log in
Don't have an user account? Register for free