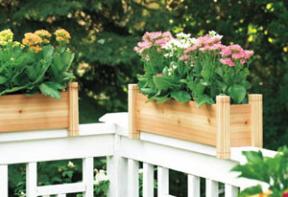
Don’t let drab plastic planter pots drag down the colours of your backyard blooms. These quick and simple cedar planters offer an alternative. They replace those ugly nursery-grade containers that plants come in, and can be made to straddle whatever thickness of deck or fence you have at home. If you don’t have a railing that could use some floral pick-me-ups, the planters can easily stand on their own. I made both a long and a short version to suit anyone’s needs.
Most building centres are well stocked with cedar deck and fence boards. These supplies are perfect for this outdoor project. Two 6'-long 5/4 cedar deck boards provide enough material for one planter box. And two 2x2 cedar balusters will create the legs. Later, as you cut your boards to size, you should be able to position your cuts to avoid the largest of the knots, leaving you with a project of predominantly clear cedar.
Plane your wood down to a 3/4" thickness for the side, end and base parts. If you use ready-made 2x2 balusters, give them a good sanding with 80- to 100-grit paper to eliminate mill glaze and remove any splinters.
Cross cut the balusters into 8"-long pieces for the legs, then cut a decorative kerf 1/16" deep around the top and bottom of each one. I find a cross-cut sled on my tablesaw is a safe way to do this work.
Clamp a stop block to the sled, set it 3/4" away from the blade, then make the repeated cuts. Mark the bottom ends of each leg, then chamfer the top ends with a block plane or sander.
The ends and base pieces come next. If you're making your planter to straddle a 2x4 railing, rip the ends and base to 3 1/2" wide.
A wider fence or railing demands wider base and end parts. Cut a piece of scrap first and check the fit over your actual railing before completing any final cuts.
I used #20 biscuits to join the planters, beginning with slots in the legs.
Whenever possible, I like to cut biscuits with the base of the joiner sitting flat on my bench with the joiner sides aligned with the edges or ends of the piece being cut. In most cases, this set-up eliminates the need for alignment marks. As well, resting the joiner on the bench is much more stable than relying on the tool's fence. You must still mark the inside and outside faces of each board, as well as the tops and bottoms, so that things don't get mixed up.
Use a scrap piece of leg stock as a spacer to align the biscuit joiner with the bottom of each leg prior to cutting. Next, when cutting the slots in the sides and ends, align the side of the biscuit joiner flush with the bottom of each board. This arrangement results in the planter legs extending below the bottom of the planter box by an amount equal to the thickness of the leg stock. It looks good and helps the parts grip your railing or fence.
Make sure the inside face of each board is oriented down on the bench when cutting biscuit slots to attach to the legs. Also, mark and cut slots in the side of the base board of the planter, as well as matching slots in the ends and sides.
One thing you'll notice is that the slots cut in the two adjacent sides of each leg interfere with each other. If this project were something large, such as a bookcase, that might concern me. But in something light and small such as these planters, reduced biscuit size doesn't reduce joint strength enough to matter. I used a sander to remove enough of each biscuit so that each one fits.
Glue-up your planters in two stages. First, apply glue to each end piece and its matching legs. Insert biscuits and clamp each end assembly. Next, apply glue along the long sides of the base board, insert biscuits and clamp the base to the sides.
After these parts have dried, apply glue to the end assemblies and the base/side assembly. Insert modified biscuits where needed (the biscuit slots will now be shallower in the legs, in the way I explained above), then clamp the ends to the base/side assembly.
Using a 1/8"- to 3/16"-diameter bit, drill drainage holes into the base of your planter. If you drill at an angle, up from the bottom of the side boards, these drainage holes won't interfere with your deck railing. To prevent the holes from clogging, put a layer of gravel in the bottom of each planter before filling with soil.
I applied two coats of Circa 1850 Tung 'N' Teak oil finish to protect my planters and keep the wood looking fresh. The finish wipes on easily and is rated for outdoor use.
The only remaining step for this weekend project is to find something beautiful to plant in these new additions to your backyard.
| Part | Material | Size (T x W x L*) | Qty. |
|---|
Long cedar planter |
|||
|---|---|---|---|
| Legs | 1 3/8" x 1 3/8" x 8" | 8 | |
| Long sides | 3/4" x 5 1/2" x 24" | 2 | |
| Ends | 3/4" x 3 1/2" x 5 1/2" | 4 | |
| Long base | 3/4" x 3 1/2" x 24" | 1 | |
Short cedar planter |
|||
|---|---|---|---|
| Legs | 1 3/8" x 1 3/8" x 8" | 8 | |
| Short sides | 3/4" x 5 1/2" x 12" | 2 | |
| Ends | 3/4" x 3 1/2" x 5 1/2" | 4 | |
| Short base | 3/4" x 3 1/2" x 12" | 1 | |
| All wooden parts are made of cedar | |||
* Length indicates grain direction
Recommendations

canadianhomeworkshop.com is part of the Blue Ant Media
Canada Network
© 2024 Blue Ant Media
More information
Social Media & RSS


Our other sites


No comments
To leave a comment, please log in
Don't have an user account? Register for free